Thursday, December 5, 2013

Stained Glass

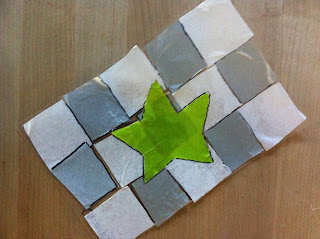
(sorry, this is a picture of my dumb sample! I'll update it with kids' work as soon as I have pictures)

Another good December project. This is inspired by the stained glass that Matisse designed.

Materials: transparency paper (cut in half), tissue paper, elmer's glue (watered down by half), sponge brushes, scissors, and optional sharpies

Discussion: Using this slideshow, pass the first slide and focus on the second which is an image of a rose window designed by Matisse for a small chapel in NY (the other windows in the church are designed by Chagall - check it out! It's gorgeous). Use the VTS discussion questions to open your discussion: What do you see? What makes you say that? What more can you find? Depending on the kids ages, you could deepen the discussion by asking about: pattern and design - is there repetition? What does that contribute to the piece? Color - how does that affect the piece? Symbols - what do you think Matisse was trying to say? Materials - how does Matisse's use of glass affect the way this piece feels?

Activity: Have the kids think of a shape that has meaning to them - like a personal symbol - and have them cut it out using a piece of tissue paper. Set aside. Have the kids then cut smaller pieces for their backgrounds (if the kids are in the younger grades, I'd pre-cut these for sure). Cover the transparency with watered-down glue using the sponge brush and then have the kids go to town laying in their designs. If you have time for their pieces to dry you could have them trace over the edges with sharpie to simulate metal tracery like in the windows but that might be tricky, time-wise (I'll probably skip that when I do it).

Rose Window with Markers


(sorry for the blurry pic)

This is a nice project to do in December as it is festive and wintery, yet you can still have a substantive discussion about an important bit of architectural art history, rose windows.

Materials: coffee filters, markers (ones that are water-soluble, so anything in our closet OTHER than the colored sharpies), black construction paper, scissors, glue stick, and a spray bottle filled with water

Background information:
This slide show has a picture of 2 rose windows. The first is a picture of the rose window in the Strasbourg Cathedral in Austria and is better suited for this lesson since it has more complicated metal work which is more like the effect the kids will create with the black construction paper & scissors. (We have another stained glass lesson which uses the Matisse window, the second slide, as its visual and I just stuck them in the same slide show for convenience).

(rose window from Strasbourg Cathedral)

I'd open the discussion using the Visual Teaching Strategy questions: 1. What do you see? 2. What makes you say that? 3. What more can you find?

{Things you may want to pull out from the kids, depending on their age: the idea of symbols. What do you think the designer of the window was trying to say? Do you think that the context of this piece of art, a church, has anything to do with that? Pattern and design: do you see repetition in the design? Why do you think the artist might repeat the design over and over? How do the artist's choice of materials (glass, metal), affect the final product of the art? (How is a window different than a painting, for example? A window requires light in order to see it…How could that be a symbol inside of a church?)}
It would probably be a good idea to read up a bit on rose windows so you have a framework for leading the discussion (here's a quick article from wikipedia).

Activity:

Have the kids make a pattern on the coffee filter with the markers, and then spray the decorated filter with the spray bottle to see the colors blend together. OR you can spray first and the kids can decorate the filters wet. It's totally up to you. The difference is that they can make a more precise drawing with it dried but it doesn't really matter because either way it will end up kind of blurry and abstract.

While that dries, have the kids fold their black construction paper into 8'ths, and then cut into it to make a geometric snowflake-ish kind of thing. Unfold, glue the coffee filter (which has hopefully dried by now :) ) to it, and then have the kids cut the black paper so it matches the coffee filter.


Thursday, October 10, 2013

Hokusai: lines and patterns


materials:
sharpies
colored markers
paper

Artist Background:
Hokusai was one of the great Japanese woodblock print artists. We watched this really great animated video from youtube here about the life of Hokusai (I used the ladybug to project it off my iphone screen. It would have been better if I brought in my speakers, though). **NOTE ABOUT THE YOUTUBE VIDEO: stop before the credits! There's lots of sumo wrestler butt cheek. It's totally innocent but might be distracting for the kids :)

After the movie, I brought up a picture of his famous The Great Wave woodblock (pictured at top), and we talked about how it's divided into sections: the background, which is plain, and then the waves themselves. Here is the 2-slide slideshow I used. The second slide I am so sorry to say is an image I found on pinterest and have not been able to track it back to the original artist, so there is no artist credit... but we used his/her interpretation of this work as our inspiration, dividing the waves into sections and filling each with different patterns.

How: have the kids look at the Great Wave woodblock and begin drawing waves on their paper. (It helps to show them on the board how to just start, drawing a great big wave across the middle.) Then from there, they can sub-divide that wave and even throw in a mountain (Hokusai's is Mt. Fuji) or volcano... Once they have waves, they can then fill them in with whatever patterns they like. You might want to have some kids come up to the board and share a pattern...


Cezanne Still Life with Apples


I found this idea on fine lines' blog, and it was really fun (albeit quite messy - bring wipes!) in both first grade and fifth grade.

Materials:

watercolor paper
sharpies
red tempera (or acrylic, if you have it) paint
pan watercolors
brushes

paper cups for red paint and water
paper plates for tracing

Cezanne background -

Cezanne is considered by many, including Picasso, to be the true father of modern art. On the Metropolitan Museum of Art website there is an amazing, really fun interactive piece on Cezanne and his apples. If you have a smartphone or ipad, I'd recommend bringing the site up on that, and using the ladybug to project it to the kids, using that to guide your discussion (there might be a way to connect your device with a cord, but you can just actually stick your device under the ladybug, turn on the ladybug, and line it up to project the screen, without any cords). Take a minute or two to check it out the Met site here.

Here is the slideshow I used to discuss his work with the kids (although I wish I'd used the Met one instead!). We discussed the paintings using the questions: "What do you see?" "What more can you find?" and "Why?" Some of the things we specifically discussed were how Cezanne's apples are not all plain red, but have lots of different colors and reflections and even shapes. We also discussed shadows. Look at the paintings and notice with the kids how Cezanne represents the shadows of the apples.

At the end of the slideshow, there is a photograph of apples on a plate. This is what we painted, for our still life.

How:

For younger kids, have them use the paper plate to trace a circle on the paper with the sharpie. (Older kids can just draw a large circle). Then, using the thick red tempera or acrylic paint, have them paint their apples. You might want to remind them to leave a bit of white in the apple to represent the reflected light. Then, using their pan watercolors, they can do the tablecloth, the plate, etc. Once the red dries a bit some adventurous kids might even want to layer in some other colors onto the apples. Some kids might also want to add shadows.


Thursday, September 5, 2013

Piet Mondrian


Broadway Boogie Woogie, 1942-43
Piet Mondrian

(Thanks Liz, for sampling this lesson at our September meeting).

Supplies:
drawing paper
cardboard square templates (in the art cabinet)
sharpies or black crayon
primary colors - could use markers, pastels, non-diluted liquid watercolors

Slideshow: Here's a link to a great one on slideshare. There is a nice opportunity in here to review the concept of primary colors (red, yellow, blue). Give the kids a chance to focus on and discuss one of the images: what's going on in this picture? What do you see that makes you say that? What more can you find?

Using the black sharpie or crayon, have the kids use their square cardboard templates to create squares on their paper (they can overlap however they like...). Then have them use the primary colors to create their color design.

Variation: Kelli had the kids do a Mondrian-inspired design onto their portfolios, incorporating their names.

Tuesday, March 5, 2013

Gelatin Leaf Printing


negative print
positive print


(Here is the link to the original project)

Gelatin printing with leaves is a simple, pretty much no-fail introduction to the world of printmaking. I made a simple slideshow to accompany this project - you can access here - and here are the nuts and bolts of this project:

materials needed:
gelatin, water, cookie sheet
water-soluable block printing ink
paper (any kind works)
brayer, styrofoam plate or tray, plastic utensil for getting the paint (which is super thick) out of the paint container
leaves (or anything thin you want to make impressions of)

You'll prepare gelatin in a cookie sheet for your printing surface, which needs to be done at least 12 hours before your class. It's quick! To make 1 tray of gelatin, boil 4 cups of water, and stir in 12 packets of knox gelatin (at Safeway this is right by the jell-o, on the bottom shelf). Mix it together so that it dissolves (it's ok if you have some clumps - you can fish them out with a spoon when you pour mixture into your tray). Pour into a tray and let it harden overnight (doesn't need to be in a refrigerator). Once you've made this, it should last for about a day.

The project:


Using the brayer, roll a very thin layer of ink (use water-soluable block printing ink) on your gelatin tray.  (It's hard to see above because my cookie sheet is black, but there is a little bit of ink rolled on)

Then place the leaves/petals/whatever on the tray.

Place a piece of paper over your leaves, and gently rub all over the paper.


Pull your paper gently off. Voila! This is a negative print (meaning, the ink is on the background, which is your negative space). (See the picture with the black background at the very top of this post, on the left)

Now, you can make a positive print. Gently pull off your leaves/petals/whatever, and place a new piece of paper on the exact spot where your old piece of paperone was. (You'll see that there is no ink on the parts where it printed on your first). Gently rub, pull off - and you'll see the ink on the subject of your print - which is the positive space of your image.

Variations on this project are endless and addicting! Have fun and send Lynne pictures.

Monday, February 4, 2013

Jim Dine-inspired hearts

                                        
Gina Colbert did this beautiful Jim Dine-inspired heart project in second grade last week. It would be great for lots of different grade levels! Here's how she did it:

Materials:
watercolor paper
watercolors (pans) & brushes
chalk pastels
black construction paper
scissors
glue sticks

Set Up:
pass out watercolor pans, brushes, and one of each kind of paper to each child. Also, put 1 color of chalk pastel on every childs' desk. (they probably have glue sticks and scissors in their desk but you may want to check with teacher to be sure. you'll need these at the end for the last step).

Art History: 
To give them a little background on pop artist Jim Dine, you can use this powerpoint (made by Cheryl Collins) here

Project: 
1. have the kids make any kind of design they want on the watercolor paper using the watercolors. Just make sure they get the whole paper covered with color.
2. while that dries, have them pick up their piece of chalk and draw a square on their black paper. When they finish their square, have them pass the chalk to their neighbor on the right and draw another square with their new piece of chalk. Do this as many times as you need to until the black paper is covered with colorful squares.
3. have kids fold the black paper in half, and then draw half a heart shape. Cut and unfold to reveal the beautiful checkered heart.
4. glue heart on watercolor paper, voila a Jim Dine masterpiece!